Search and Match in Salesforce
RChilli Search and Match can be integrated easily with the Salesforce application and is used for search and match for resumes and jobs. The integrating solution has an easy-to-use setup, which once configured is ready to call RChilli search and match.
Configuring the Integration
- Visit https://appexchange.salesforce.com/ and search for the RChlli in the search bar.
Select RChilli Resume/CV Parser from the searched Apps.
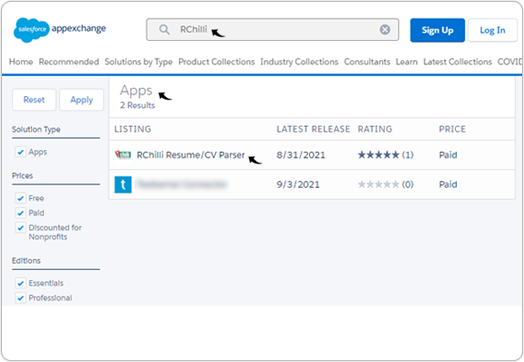
- Click Get It Now to install RChilli Resume / CV Parser.

- To login into the Salesforce, click Log In (using Trailblazer.me) or
Continue as Guest.
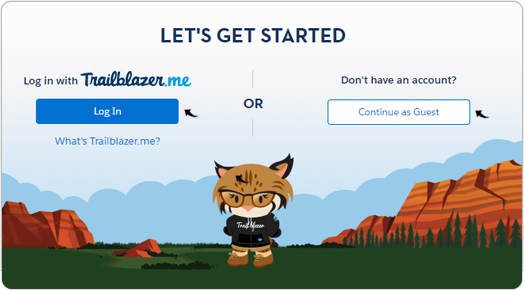
- Once you click Log In (using Trailblazer.me), you will be directed to
the Salesforce page to log in. Enter Username, Password, and
click Log in for your Salesforce account.Note: If you are new to Salesforce, click Try for Free to sign-up for the Salesforce account.

- Once you successfully login into your Salesforce account, select from
following options to install the RChilli package:
- Install in Production
- Install in Sandbox

- On the Confirm Installation Details pop-up, accept the terms and
conditions and click Confirm and Install.

- On the Install RChilli pop-up, select from the following options to
install the RChilli package and click Install:
- Install for Admins Only
- Install for All Users
- Install for Specific Profiles

- On the Approve Third-Party Access pop-up, grant access to third-party
web sites and click Continue.

- Once the installation completes, click Done.

- Once you successfully install the RChilli package, you will be directed to
the Salesforce page. Click on the App Launcher in the top left
corner. Search for the RChilli on the search box. Select the
RChilli from the search box drop-down options.

- Go to the Settings tab, update the Personal Information page
to avoid any error on the next page.

- Go to the RChilli Configuration tab, click to Connect to
RChilli.

- Once you are connected to RChilli, select the checkbox to Activate Search
and Match.

- Once you are connect to the search and match, go to the
RChilli Field Mapping tab and do the following:
- Select Type: For this field select Job Description field Mapping from the drop-down.
- Select an Object: For this field you can select the existing object (this is called Primary object) from the drop-down or create the object based on your schema and then select the newly created object. The objects are used to store the specific field data.
- Object Schema Fields: Based on the schema of the object, the
schema fields (in below example Job Description,
Index, Type, and Title are the object schema
fields) will be displayed. Map a value for each object schema fields
from the drop-down or create a new custom field under the object (in
below example Account is the object) with same data type as
the object schema field.

Create Flow
- On the Salesforce home page, search for Flow in the search bar and click
Flows in the drop-down.

- On the Flows page, click New Flow.

- On the New Flow pop-up, select Record-Triggered Flow and click
Create.

- On the Configuration Start pop-up:
- Select Object: Select the Object related to the Job Records.
- Configure Trigger: Select a trigger creteria for flow i.e., A
record is created or updated.

- Set Entry Conditions: Add two condition as mention below:
- Field: Job_Description_c Operator: Is Changed Value: True
- Field: Job_Description_c Operator:
Is Null Value: False

- For the Optimize the Flow for section, make sure you selected
Actions and Related Records and click Done.

- Click Plus
 symbol to add element for the
flow.
- Click Action to add a New Action for the flow.

- On the New Action pop-up, do the following:
- Action: Select Update Job Index Id from the Action drop-down.
- Label: Enter pass record id in the Label field.
- API Name: Enter Job_Parse in the API Name field.
- recordIdList: Enter {!$Record.Id} in the
recordIdList field.Note: Turn the toggle to Include to enter a recordIdList.
- Click Done to completes the new action.

- On the Save the flow pop-up, enter Flow Label, Flow API
Name, and click Save.

- Once the flow is saved, click Activate to activate the flow.

Upload Jobs
- Once the mapping is completed above, you can upload jobs. Click on the App
Launcher in the top left corner. Search and select the object, you
mapped in the above step, from the searched drop-down options.

- On the object page, click New to add jobs.Note: Existing jobs are displayed in the object (Account) job table.

- On the New Account: Type page, fill the mandatory fields i.e., Account
Name (JD name), Index, Description, Job Description
and click Save to add a new job.Note: You can click Save & New to save the job and add more job to the object job table.

- Once the job is added in the above step successfully, job is listed in the
object job table,
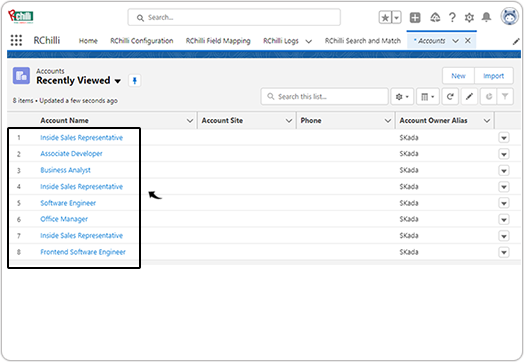
- Click on any of the listed jobs above to view the job details. Navigate to the
Related, Details, and News tab to view more details on
the job. Note:
- The Matching Resume block display all the matching resume relevant to the job you uploaded. You can click View icon to view the resume details or click Delete icon to delete the matching resume.
- You can click Next to view more matching resumes.
- If the Matching Resume block is not displayed, you must do the customization of the page as mention in Customization of JD and Resume page.

Upload Resume
- Once the configuration is completed and job fields mapping are done, return
to the Home page and upload the resume in the Parse Resume
block.Note:
- The Parse Resume block can be placed on any application page in Salesforce. For more details, see Placing the Parse Resume Block.

- Once the resume is successfully uploaded, a new tab is displayed
with the Matching Jobs details (resumes matches with the jobs you
uploaded in the Upload Jobs section). You can navigate to the Details,
Activity, Chatter, and News tabs to view more
details about candidates.Note:
- The Matching Jobs block display all the matching jobs relevant to the candidate with the matching score. You can click View icon to view the job details or click the Delete icon to delete the matching job.
- You can click Next to view more matching jobs.
- In the Details tab, you can see the values for those fields that you mapped for the object schema in the step-14 above.
- If the Matching Jobs block is not displayed, you must do the customization of the page as mention in Customization of JD and Resume page.

Search and Match
Once the configuration is completed, job fields mapping are done, candidate resumes and jobs are uploaded, you can search the job with the keyword and the matching candidate is displayed based on the searched keyword.
- Go to the the Home page and click RChilli Search and Match tab. On
the Search and Match tab, do the following:
- Enter a keyword in the Search Resume search box and click Search Resume.
- You can Select Page Size from the drop-down as necessary.
- The matching candidates based on the searched keyword are displayed, you
can click View icon to view the candidate details or click the
Delete icon to delete a matching candidate. You can click
Next to view more candidates.

- Once you click View icon above, candidate details page is displayed with
the matching jobs details. See Add Resume for more details.

Customization of JD and Resume page
You can customize the view and blocks in the resume and JD page as mentioned below.
Customization on the Resume page
- Go to any resume page, click Setting icon and select Edit Page
from the drop-down.

- On the Custom - Managed section, select RChilliJobMatchCmp,
drag and drop in any area of page to get the Matching Jobs block.
Click once completed the customization.

Customization on the JD page
- Go to any JD page, click Setting icon and select Edit Page
from the drop-down.

- On the Custom - Managed section, select RChilliResumeMatchCmp,
drag and drop in any area of page to get the Matching Resumes block.
Click Save once completed the customization.

Email Integration
You can integrate your email by configuring webhook URL in the Salesforce. Once your email is integrated, you can send resumes to resume@hiretalent.ai so that resumes get uploaded to your Salesforce account.
Follow the below steps on how to configure webhook URL to integrate your email.
- Go to the RChilli Configuration tab, Enter Webhook URL if you
already have, if not follow the below steps to get the webhook URL.Note: You can follow the steps mention in the instructions block to get the webhook URL.

- Click on the Setting icon on the right side of the page and select
Setup from the drop-down options.

- Search for the Sites and select Sites from the drop-down
options.

- On the Sites page, click New to create a new webhook URL.

- On the Site Edit page, enter Site Label, select Active
checkbox, and click Search icon and select
AnswersHome for Active Site Home Page.

- Once you filled the details as mentioned above, click Save at the bottom
of the Site Edit page.

- Once you click Save in the above step, webhook URL is created and you can
find the webhook URL in the Sites page (step-4 above). Right click on the
webhook URL (Site URL column) and select Copy link address to copy the
webhook URL.

- Once you copy the webhook URL above, go to the RChilli Configuration tab again,
Enter Webhool URL, and click Register Webhook.Result: Once the webhook register successfully, that means your email is now integrated and you can send email with resumes to resume@hiretalent.ai so that resumes get uploaded to your Salesforce account.Note: Before you start sending the resumes for email upload, you must give the permission to the Sitelable profile, see Permissions for Sitelable Profile.

Permissions for Sitelable Profile
- Click on the Setting icon on the right side of the page and select
Setup from the drop-down options.

- Search for the Sites and select Sites from the drop-down
options.

- On the Sites page, click on the Sitelabel link.

- On the Sitelabel page, click Public Access Settings.

- Go to the Field-Level Security block and click Contact
[View].Note: This is for the resume field mapping. You have to select the object that is related with the resume fields

- Make sure all the fields listed in the Field Name column, given Read
Access and Edit Access, if not, click Edit and make sure
you have give both access for all the fields. Once you given access, click
Back to Profile to go back to the Sitelabel Profile
page,

- Go to the Field-Level Security block again and click Account
[View].Note: This is for the Job field mapping. You have to select the object that is related with the Job fields.
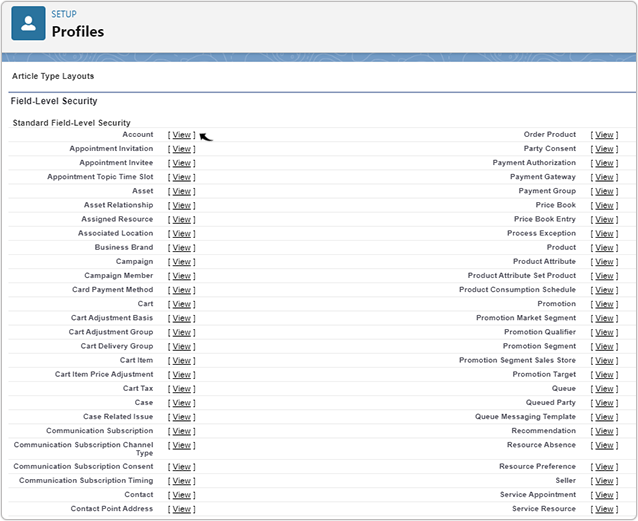
- Make sure all the fields listed in the Field Name column, given Read
Access and Edit Access, if not, click Edit and make sure
you have give both access for all the fields. Once you given access, click
Back to Profile to go back to the Sitelabel Profile
page,

- Go to the Custom Field-Level Security section, click [View] for
all the custom fields (for example Achievement, Qualification, Certification,
etc.), and make sure that all the fields given Read Access and Edit
Access, if not, click Edit and give both the access.

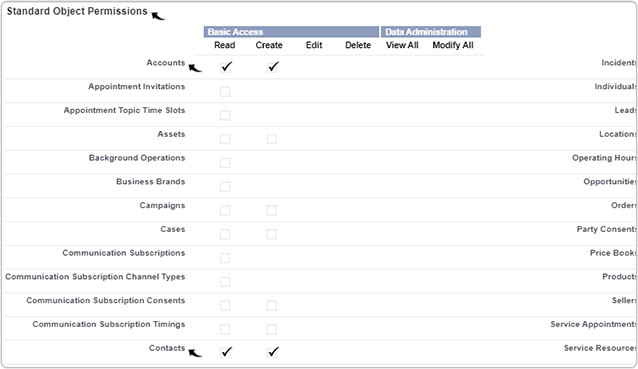
- Go to the Standard Object Permissions section, make sure that Job related
object (For example, Accounts) and resume related object (for example, Contacts)
are given Read and Create access. If not, click Edit (see
next step) and give access.
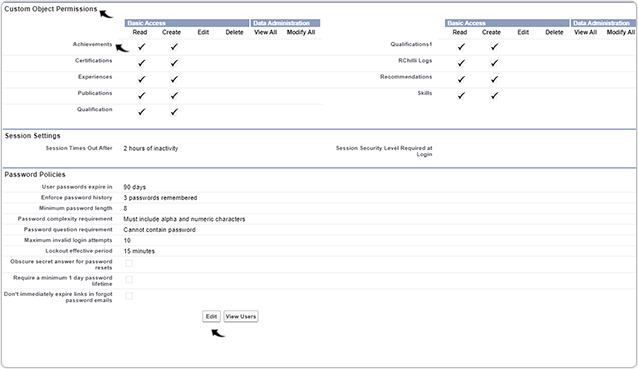
- Go to the Custom Object Permissions section, make sure that all custom
objects, for example Achievements, Certifications, Skills, etc are given
Read and Create access. If not, click Edit and give
access.
- Go to the Enable Apex Class Access section, click Edit.
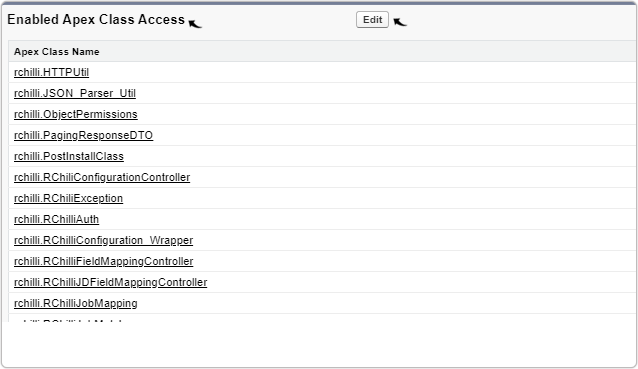
- Select all the fields in the Available Apex Classes and click Add to move
the fields to the Enable Apex Classes block. Click Save to save the
changes.

Placing the Parse Resume Block
- Go to any page of any Salesforce application, such as the Home page
at Service application of Salesforce.

- Click on the Gear icon on the right side of the page and select
Edit Page from the dropdown options.

- Search for UploadFileComponent in the search bar. Select
UploadFileComponent and drag to the required place that will
display as Parse Resume block. Click Save at the top right
corner of the page.

RChilli Logs
When you use RChilli App for parsing the resume and get any error or process failed, then you can see the error in the RChilli Logs tab. Under the RChilli Logs tab, you will see all the error/info/exception logs that you can view to debug the problem/error.
- Click on the App Launcher on the top left corner. Search for the
RChilli on the search box. Select the RChilli from the
search box dropdown options.

- In the RChilli application, under theRChilli Logs tab, you can
see all the error logs listed below the RChilli Log Name.

- Once you click any error logs then that error logs details will be displayed
with all the logs details such as Description, Type, Line
No, etc, under the Details tab.

